entrée.NET Setup & Options

Contents
Initial Setup Process for the Electronic Order Pad Application
For the System Administrator, each DSR and their device there is a one time setup process that must be completed before the Electronic Order Pad application can be used. Here is an overview of the process:
1. First, in the entrée.NET Setup & Options section of this chapter the System Administrator will follow the instructions to assign each DSR a unique Username and Password.
2. Next the System Administrator will set and check the system Options using the steps detailed in the first part of entrée.NET Setup & Options.
3. In entrée Options follow the steps to update the main entrée system Salesperson/Broker File Maintenance General Options section for your DSRs. Here you will assign DSRs to provide overlapping coverage and support for your customers in sales.
4. Then review the entrée.NET Scheduler and the Manual Export / Import of Data chapters and set up the Scheduler to perform your updates from and to the main entrée system.
5. Now the DSR will perform either the iPad Device Setup or Android Tablet Setup depending on the type of tablet your company has provided.
6. Once the DSR is done with Device Setup, the System Administrator can use the instructions in the entrée.NET Licenses topic to view the available licenses, devices registered with the DSR's device name, date and time the licenses were activated.
 A process to revoke licenses is available for System Administrators in entrée.NET to maintain control of device licenses. The revoke process will not prevent the device from being re-registered in the future.
Salesperson Setup in entrée.NET
When you click on the Salesperson Setup tab your entrée salesperson file is displayed. You can sort the salesperson file using any of the underlined column headings in ascending or descending order.
If your salesperson is not in the Salesperson Setup tab display, it means you must add them to the main entrée system using Salesperson/Broker File Maintenance. The entrée Salesperson/Broker file is where you will define a salesperson's name and address, as well as how they are to be paid commissions. After adding any missing DSRs to entrée you must run the export to entrée.NET to update your salesperson data in entrée.NET and Electronic Order Pad. See the Export to entrée.NET section for an overview.
Consult the entrée V3 or entrée V4 SQL Knowledgebase for the version of entrée you are using for more information about Salesperson/Broker Maintenance.
Assign Usernames & Passwords
First, the System Administrator must login to entrée.NET and assign a unique Username and Password to each DSR that will be using Electronic Order Pad. You may have already done this process to give your DSRs access to entrée.NET, if so you can skip this step and continue on to the Setting entrée.NET System Options section.
Consult the online entrée.NET Knowledgebase for more detailed information.
Follow these steps to create entrée.NET Accounts for your DSRs:
1.Click on the Salesperson Setup tab.

2.Scroll down the list or use the Search tool to find the specific salesperson you need to give access to entrée.NET.
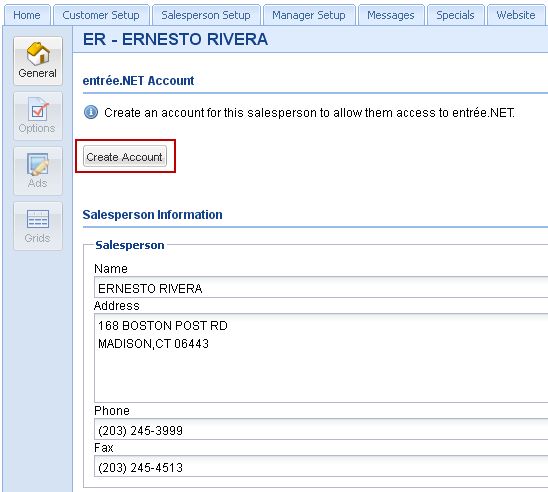
3.Click the edit salesperson icon (outlined in red in the image above) to view the salesperson’s account information.
4. If the DSR does not have an account (the Login Name column will be empty) click the Create Account button.
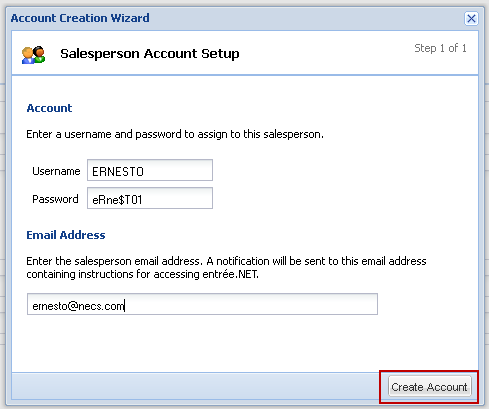
5.The Account Creation Wizard displays the Salesperson Account Setup dialog box.
6.In the Account section enter a Username and Password for your salesperson .
7.In the Email Address section enter the email address where your salesperson wants to receive their account setup information and emails.
8.Click the second Create Account button. |
|
9.Now a Salesperson Account Setup email will be automatically sent to the salesperson’s email address informing them that their account has been created and providing them with their Username and Password.
Setting entrée.NET System Options
The second step in the setup process requires the System Administrator to set system options in the Electronic Order Pad section and review the settings for other option sections in entrée.NET.
•How to Set System Options
1.The System Administrator must log into entrée.NET on their computer.
2.Click the Settings tab
3.Click on the Options button in the menu on the left.
4.Scroll down to the Electronic Order Pad section. Use the minus or plus sign icons next to the section headings to expand or collapse the list.
5.Option Description and Current Setting columns are displayed for each option.
6.Click in the Current Setting column to select the new setting from the drop down list. At the bottom of the screen a full explanation of how the selected option will operate is displayed.
7.Option changes will update immediately.
Consult the entrée.NET Knowledgebase for more detailed information and to see any new options that have been added to entrée.NET Settings Options.