Special Pricing

Contents
The Special Pricing feature allows salespeople to modify a customers special price file outside of the order entry process.
When a special price item's Unit Cost or Bid Prices are changed in the Electronic Order Pad (EOP) Special Pricing feature the changes get imported back into entrée. In entrée the customer's special price items or bid prices will be updated using the imported values from EOP.
This feature is enabled in the entrée.NET Settings tab by the System Administrator. If the feature is not enabled it will not display in the main menu for the Electronic Order Pad.
In entrée.NET Settings Tab Options in the Electronic Order Pad section check option #120 "Allow salesperson to access the Edit Special Pricing feature." to enable the "Special Pricing" feature and the display of the menu option in the main menu.
From here a salesperson can add or remove items and edit pricing based on the settings of entrée.NET Electronic Order Pad section options #90 "Allow salesperson to create and edit customer special pricing" and #91 "Allow salesperson to edit customer Bid 1 and Bid 2 pricing."
Tabs & Tools
The Customers, Price, History and Lots tabs shown in this screen are the same tabs described in the Create Order chapter.

Item Tools
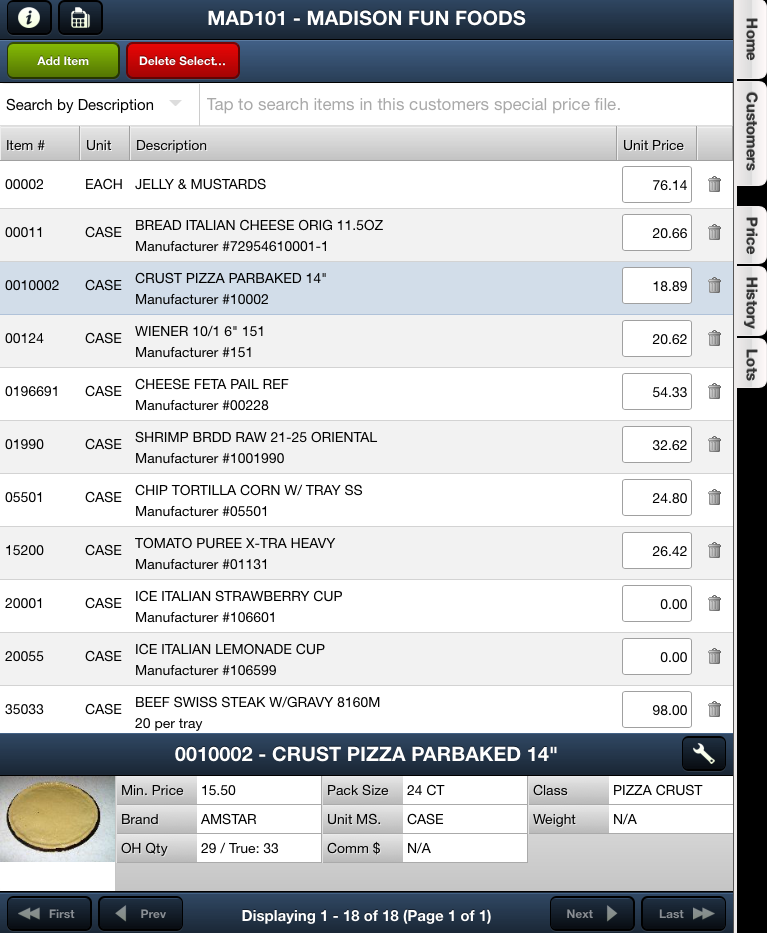
At the far right end of the Item line the Trash or Recall button will be displayed, dependent on the status of the item.
![]() Trash button: Used to delete the selected item from the customer's special price file.
Trash button: Used to delete the selected item from the customer's special price file.
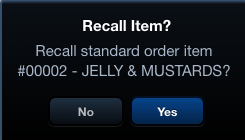
 Recall button: Used to restore an item you just deleted by mistake to the customer's special price file.
Toolbar

Add Item: Use to add new items to the customer's special price file.
Recall Selected: Used to restore the selected item to the customer's special price file.
Delete Selected: Used to remove the selected item from the customer's special price file.
Using Search
There many ways to search for items in the special price file by tapping the Search menu arrow.
▪Search by Description
▪Search by Class
▪Search by Brand
▪Search by Item UPC
▪Search by Item #
Once the type of search is selected from the menu use the pop-up keyboard to enter your search text into the Tap to search items in this customer's special price file area. Then tap the Return key in the keyboard to perform the search.
Using the Special Pricing Feature
1. Tap the Special Pricing option in the main menu.
2. The Customers list will be displayed.
3. Tap and select a customer in the list to view and edit their special price items.
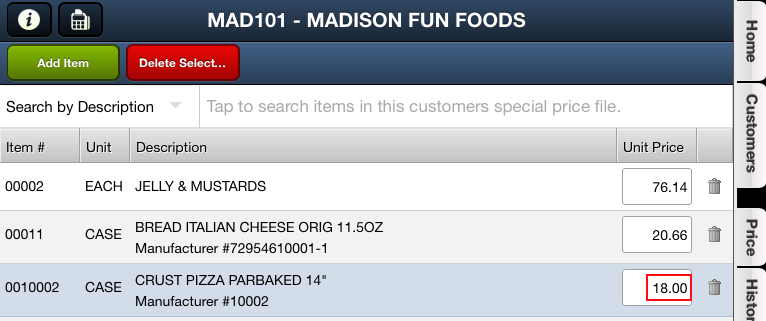
4. The customer's list of special price items will be displayed.
•Use the Search features to quickly find the desired item.
|
|
5. Tap the item's Unit Price field to open the Customer Special Pricing dialog.
|
|
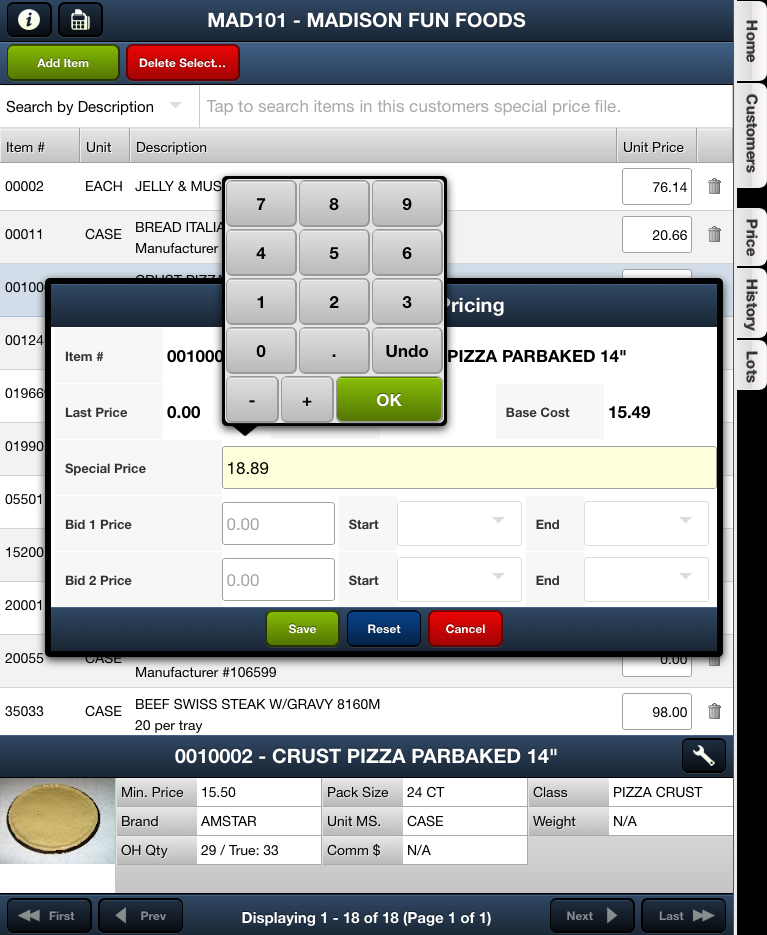
6a. To change the Special Price tap in the price text area. A number keypad will display for you to edit the value. Tap OK.
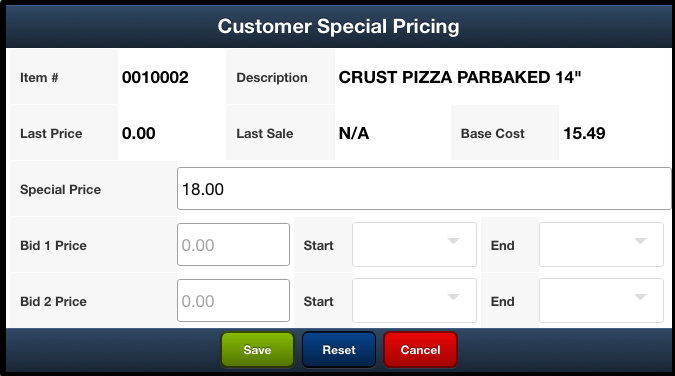
6b. For Bid 1 Price and Bid 2 Price tap in the price text areas and number keypad will display for you to edit the value. Tap in the Start / End fields to edit these values.
7. When Customer Special Pricing editing is completed for the item tap Save.
▪Tap Reset to clear your edits and start again in the dialog.
▪Tap Cancel to cancels your edits and closes the dialog.
8. The Unit Price of the item has now been edited and saved for the selected customer. Once the new price gets imported back into entrée the customer special price file will be updated.
Using Delete / Recall for Items
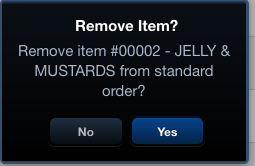
Select an item then use either the Trash icon or the Delete Select... buttons to remove the selected item from the customer's special price file.
The Remove Item? message box will display for you to confirm the removal.
Tap Yes to continue. Tap No to cancel the removal. |
|
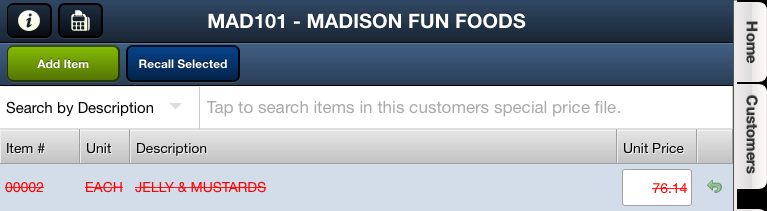
 This is what the item line will look like after the removal.
 Once a deletion has been performed you must restore any items before the next run of the Standard Export from entrée is completed. Times can vary depending on the schedule implemented for the export if using the TEA/Scheduling Utility in entrée or if you are manually running the export.
You have two ways to restore the item to the list in your window of opportunity. Use the Recall icon or the Recall Selected button.
The Recall Item? message box will display for you to confirm the recall.
Tap Yes to continue. Tap No to cancel. |
|