Slotting

Contents
The Slotting feature uses the Warehouse Section Maintenance utility. This feature represents the first step in allowing entrée to provide you with slot-based inventory tracking and warehouse management. The Slotting feature is not fully developed at this time. In the future the capabilities will be expanded with powerful slotting tools and management capabilities.
Overview
Slotting is the activity of determining the most appropriate storage location for each item in your warehouse. The main objectives of slotting are: to increase picking replenishment and put-away efficiency, to reduce product handling and labor costs, and to maximize the use of your warehouse space.
The Slotting option, in the entrée V4 “Inventory” ribbon menu, currently provides the Warehouse Section Maintenance utility. This feature represents the first step in allowing entrée to provide you with slot-based inventory tracking and warehouse management. More tools are being developed to expand the Slotting feature's tools and management capabilities.
Control Access in Security Management
To control what employees have access to the update the information in the Warehouse Section Maintenance utility you can edit the User Account Settings in the entrée Security Manager.
The Warehouse Section Maintenance box is checked by default giving all entrée system user accounts access to this feature. If you would like to remove access to the Warehouse Section Maintenance utility you must uncheck the box for those employees. Follow these steps:
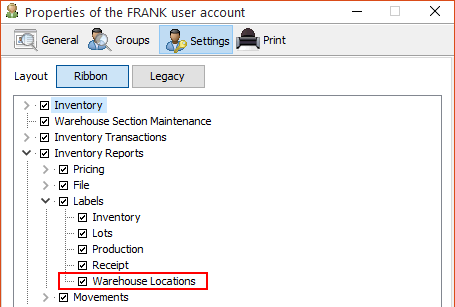
1.Go to the System ribbon menu. 2.Select Security Management... 3.Select the User Account you want to change. 4.Click the Edit button. 5.When the Properties dialog opens click the Settings button. |
|

6.Below Inventory you will find Warehouse Section Maintenance uncheck the box to remove access. 7.To control access to warehouse location labels go to Inventory Reports > Labels > Warehouse Locations. Uncheck the box to remove access. 8.Click OK. 9.Repeat this process for all user accounts that need access removed. |
|
Warehouse Section Maintenance Utility - Section Information
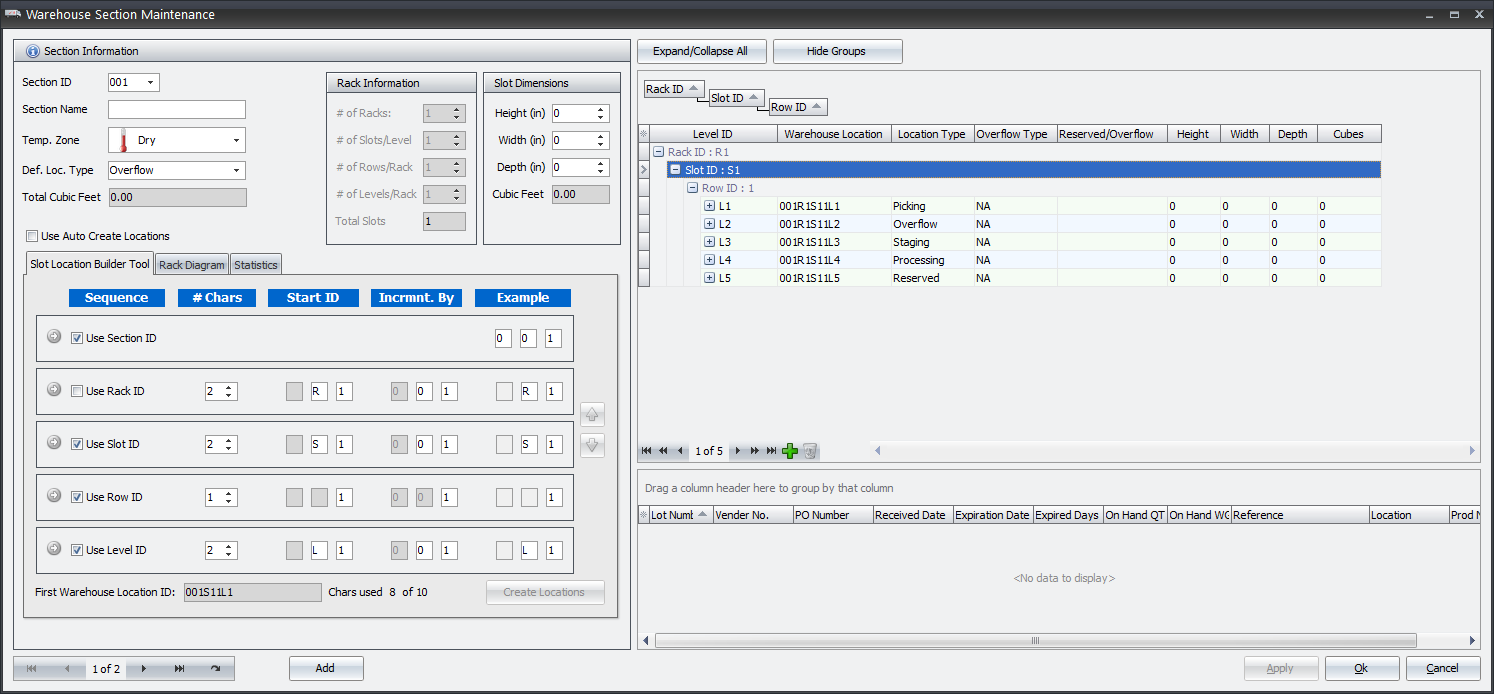
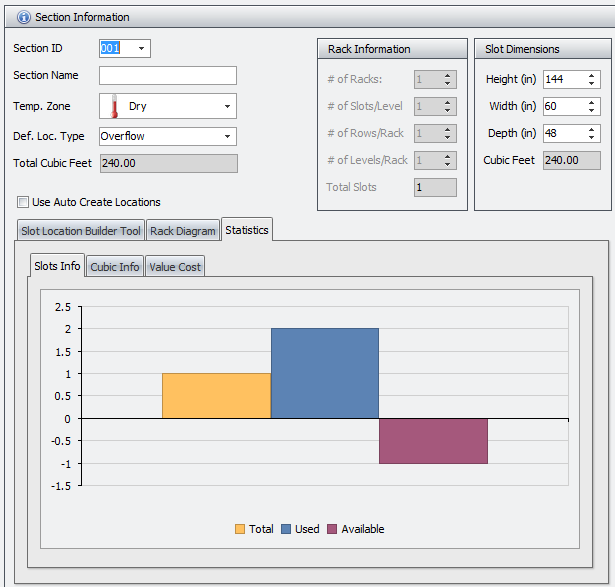
The Section Information area allows you to describe the layout of your facility to the entrée system. Once the racks and slots are defined in the system you can assigned inventory to and manage those areas of the warehouse.
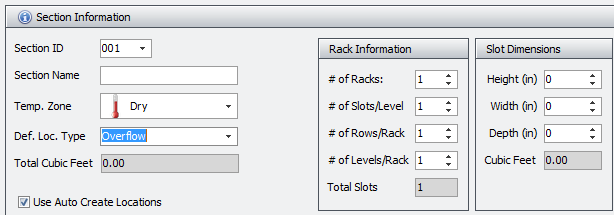
•Section ID - Enter a 3 digit Section ID or make a selection from the drop down list to access an existing section.
If the Section ID does not exist yet the Confirm message will be displayed. Click Yes to create the new Section ID here.
To select from your existing Section IDs use the drop down menu. |
|
 Click the
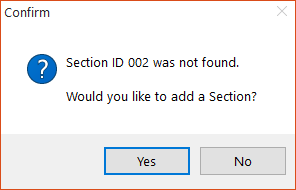
•Section Name - Enter a name for your section it could be a warehouse name or aisle, what ever works for your business.
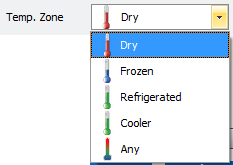
•Temp. Zone - Use the menu to assign a temperature zone to the section. ▪Dry ▪Frozen ▪Refrigerated ▪Cooler ▪Any |
|
•Def. Loc. Type - Use the menu to assign a location type to the section. This value can be changed in the Section Dashboard on the right as needed to manage your racks. ▪Reserved - Area reserved only for a specific product. ▪Overflow - Assign Class or Item designation to the area. ▪Staging - Area where items wait to be loaded on trucks. |
|

▪Processing - Area where the items stored are processed into other products, like meat to be cut and processed or ingredients to be combined to make a new product.
▪Chaotic - Uses random storage assignment taking the available storage space as needed for items with similar temperature zone requirements. (Not supported at this time)
▪Picking - Area where picked items are stored.
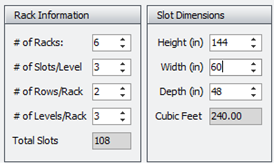
•Total Cubic Feet - This value will be calculated for you once you enter Rack Information and Slot Dimensions. You cannot edit this field.
Rack Information
If you do not have the Use Auto Create Locations option checked this area will be unavailable. See the Use Auto Create Locations process topic for information.
Slot Dimensions Enter all the Slot Dimensions values in inches to define the slots in a specific warehouse rack are creating. The Height, Width and Depth values will be used by the system to calculate the Cubic Feet for you. |
|
Slot Location Builder Tool
For details about this feature see the section covering the Slot Location Tool Builder that follows.
Rack Diagram
This is a diagram to illustrate the terms used by the entrée system for describing a racks, levels, slots and rows. |
|

Statistics
•Slots Info - Shows you statistics related to the number of slots in the currently selected Section ID rack.
▪Total - Total number of slots in the section. ▪Used - Total number of slots used. ▪Available - Total number of slots open and available for use. |
|
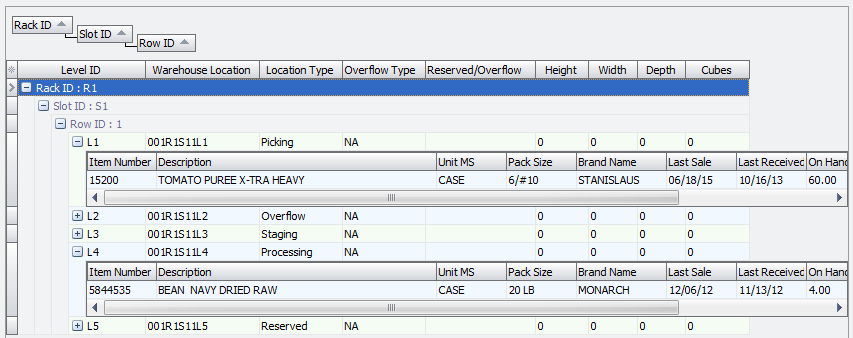
 This is the Section Dashboard for the rack location used for the statistics shown here.
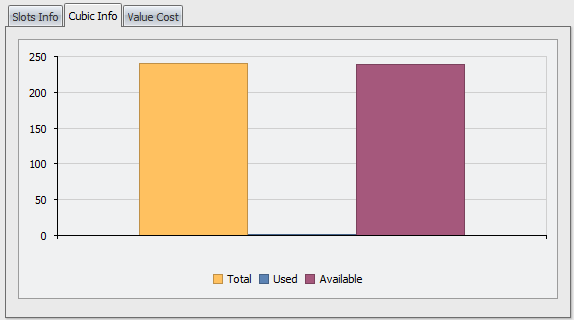
•Cubic Info
▪Total - Total number of cubic feet in the section. ▪Used - Total number of cubic feet used. ▪Available - Total number of cubic feet open and available for use.
|
|
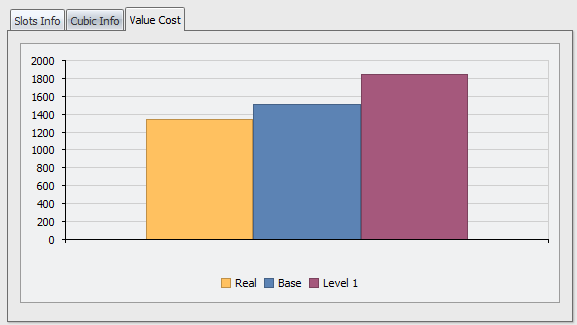
•Value Cost
▪Real - Real cost of items in the section. ▪Base - Base cost for items in the section. ▪Level 1 - Amount at price level 1 for items in the section. |
|
Assigning Items to Warehouse Locations in Inventory File Maintenance
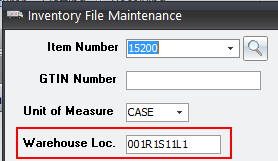
There are two ways to assign the Warehouse Location ID to an item, use the Warehouse Loc. field or use the Slots Tab.
•You can manually assign a warehouse location to items.
1.Enter the Warehouse Location ID in the Warehouse Loc. field. 2.Click Apply to save.
|
|
•Or in Inventory File Maintenance for the "Picking" Location Type only use the Slots Tab to select the warehouse location.
1.Go to the Inventory ribbon and click the Inventory option.
2.Use the search feature to find the desired item.
3.Click the Slots Tab.
4.Use the Warehouse Location drop down arrow and select the desired "Picking" Warehouse Location IDs created using the Warehouse Section Maintenance utility.
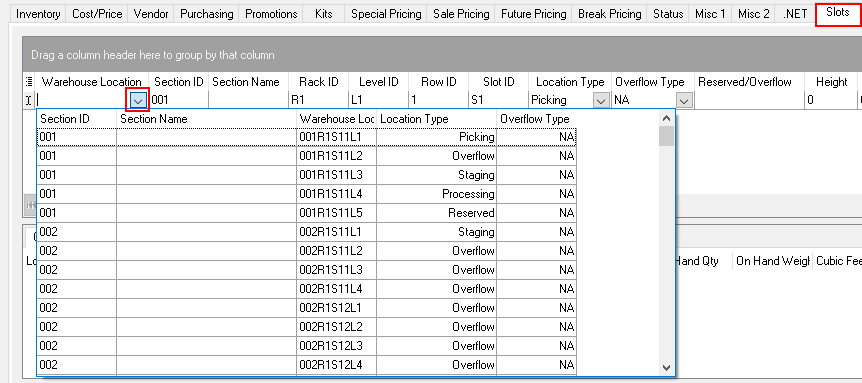
5.Click Apply.
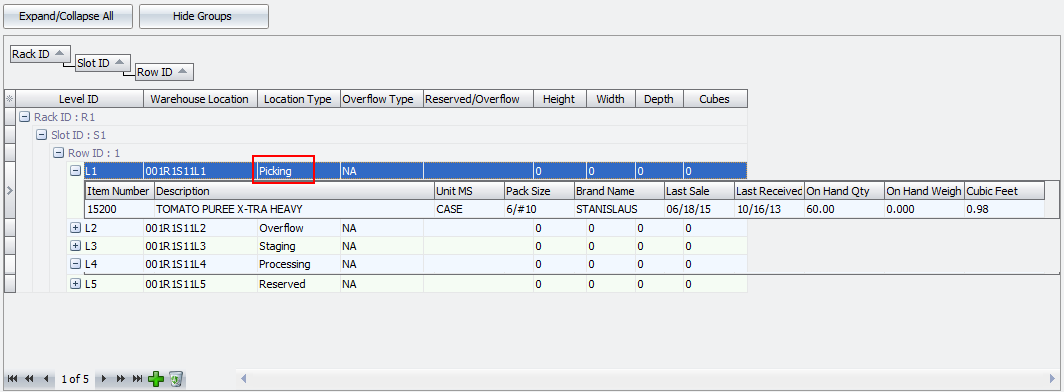
6.Once items are assigned a warehouse location the items will be displayed in the Section Dashboard as seen below.