Items Tab
This Items tab lists all the items that have been purchased from the vendor. The tab has two sections, on the left is the item details grid and on the right is the item vendor tab information for the selected item.

Show Primary Items Only
Check the box for this option if you only want the items that have the current vendor assigned as the primary vendor displayed. Primary Vendor is assigned for the item in the Inventory file Vendor Tab.
Override Ordering
When checked this option will allow you to specify Minimum Weeks and Order Weeks for the item Auto P.O. Parameters in the item detail panel to the right of the Items grid.

Item Details Grid Section
 Add Item
1. Click the Add button to open a new line in the grid.
2. Next either enter the item number or use the search tool  to open the Inventory Search window to find the item.

3. Click to select the item in the Inventory search window and it will be added to the Items list on the screen.
4. Click the Apply button to save the item.
 Delete Item
Select the item then click the Delete button to remove an item from the vendor's Items grid.
Configuring the Item Grid Columns The Grid Configuration button (outlined in red) is used to control the columns you view and their order.
1.Click the button and a list of the columns available in the Items Tab items grid is displayed.
2.Check the columns you would like to see displayed in the grid.
3.Drag and drop columns to order them as you require. |
|
Item Details Grid Columns
•Sort - Columns can be used to sort the items by clicking the up or down gray arrow in the header.
•Group By - Drag a column header to the gray Drag a column here to group by that column area. Below you see the item grid grouped by Primary Vendor and Brand Name.
|
|
 Below are two images showing all the fields that can be displayed for the item. Columns shown from left to right starting with the first image. You can organize this information and show/hide the columns as you like.


Editing in the Items Tab Grid
•You can edit Pallet Information for an item in the item grid and the Pallet Information in the Item Detail area on the right will update.

Item Detail Information Area
All the information in this section is initially defined and comes from the item's Inventory file Vendor Tab.
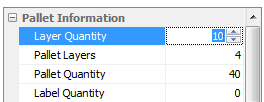
Pallet Information Section
This area shows the number of pallets and layers for the item. Click in a field and hit the Enter key to edit the pallet information.
To edit a field click in the field and hit the Enter key or double-click or click in the field and enter your value. |
|
Label Quantity (Pallet Label Quantity) has been added to set how many cases should print on a pallet label and is a six digit field.
If Label Quantity is defined this will override the Pallet Quantity amount when printing pallet labels. A lot of times in food distribution, the vendor or manufacturer will stack pallets as high as they can fit inside of a trailer truck. Which is how the product is typically ordered (in whole pallets). However after the product reaches the warehouse those pallets are too tall to fit in the racks. The distributor then has to take off layers to bring it down to an acceptable height. That is what the pallet labels feature is for. i.e. boxes of chicken tenders come off the truck 13 block 12 high or 156 to a pallet (pallet quantity) but need to be broken down to 9 high or 117 to fit in the racks (Pallet Label Quantity).
•See the Inventory File chapter Vendor Tab Pallet Info topic for more details about this feature.
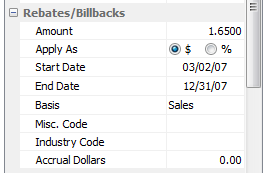
Rebates / Bilbacks Section
This area shows you all information related to rebates and billbacks for the selected item. Click in each field and hit the Enter key to edit as required.
•See the Inventory File chapter Vendor Tab Rebates / Bilbacks topic for details about this feature.
|
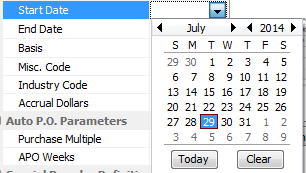
•Click in a Date field and hit the Enter key. Then click the down arrow to display a calendar.
|
Auto P.O. Parameters Section
Values are Read Only. The fields in the Auto P.O. Parameters section are set up on the item's Inventory File Vendor Tab. These fields are used by the system to determine if and how much of a product should be ordered.
See the Inventory File chapter Vendor Tab PO Options topic for details about this feature. |
|
 Field name changes: APO Weeks is now labeled Minimum Weeks and Purchase Multiple is now labeled Order Weeks.
Special Reorder Definitions Section
Values are Read Only. This special reorder definitions are set up on the item's Inventory File Vendor Tab. This feature supports as many as four definitions for the item.
Special Reorder Definitions can be set up here for items with for the specific vendor.
The values specified for the special reorder definitions are only used on the PO Guide report.
|
|
•See the Inventory File chapter Vendor Tab Special Reorder Definitions topic for details about this feature.


