Buttons, Icons & Page Controls
Buttons
 Save the current edit and move to the next editable field. Save the current edit and move to the next editable field.
 Apply the current changes. Apply the current changes.
 Save the screen contents. Save the screen contents.
 Takes you Back to the previous screen. Takes you Back to the previous screen.
 Will Cancel the last edit or action and exit a dialog. Will Cancel the last edit or action and exit a dialog.
 Will Close the current dialog box. Will Close the current dialog box.
 Will Close the current screen. Will Close the current screen.
 Will open the selected invoice for viewing. Will open the selected invoice for viewing.
 There are other buttons specific to the function of the screen that you will find. There are other buttons specific to the function of the screen that you will find.
|
Icons
 Delete the currently selected field or item. Delete the currently selected field or item.
 Go Back to the previous field in the screen. Go Back to the previous field in the screen.
 Undo the last action or edit. Undo the last action or edit.
 The Circled "X" icon will remove the contents of a field. The Circled "X" icon will remove the contents of a field.
 Opens the Customer Information screen. Opens the Customer Information screen.
 Opens the Accounts Receivable (A/R) screen. Opens the Accounts Receivable (A/R) screen.
 Opens the Information Panel Setup dialog. Opens the Information Panel Setup dialog.
  For companies with entrée.DOC the document scanning add-on module for entrée. The .DOC paper clip icon tells a salesperson that a scanned image of the paper invoice is available for viewing. For companies with entrée.DOC the document scanning add-on module for entrée. The .DOC paper clip icon tells a salesperson that a scanned image of the paper invoice is available for viewing.
|
Page Controls
First - View the first message or page.
Prev - View the previous message or page.
Next - View the next message or page.
Last - View the last message or page.

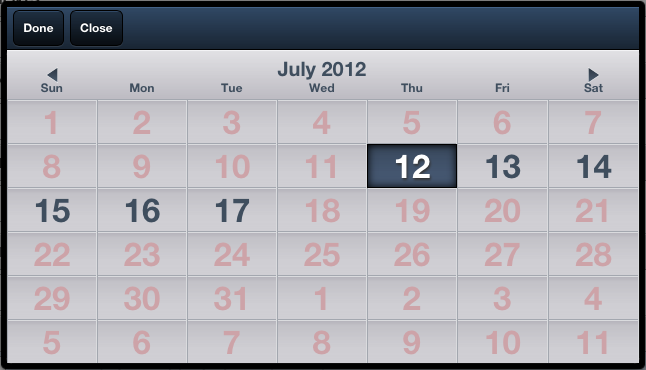
Calendar Tool
Tap a date and the calendar tool will open so you can tap a date and select it.
Tap Done after you select a new date.
Tap Close to return to the screen.


 Takes you


 Will open the selected invoice for viewing.
 There are other buttons specific to the function of the screen that you will find.


 Opens the